Description
This document describes the procedure for manually operating handthrow electric points.
Not what you are looking for? See more Procedures
Introduction
If the Signaller has given authority, hand throw electric points machines may be operated manually.
These points can be operated manually with a hand throw lever that is secured in the normal position and released by either:
- an SL key, or
- a key that is obtained from an Emergency Operation Lock (EOL) cabinet located near the points.
Electric hand throw points machines must not be operated manually without the Signallers authority.

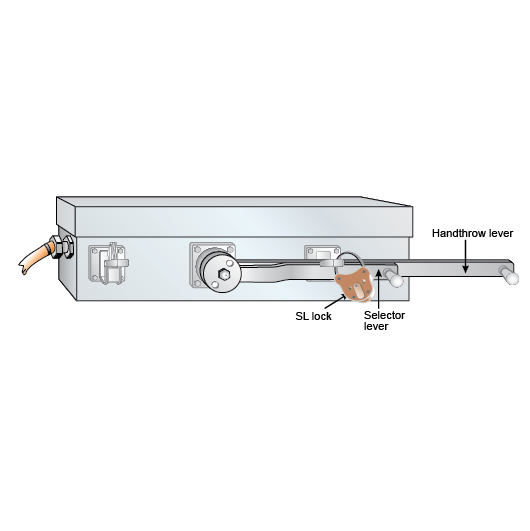
Hand throw points released by an SL key
These points have:
- a short selector lever with HAND and MOTOR positions to allow the points to be switched between signal box control and trackside control, and
- a long hand throw lever with NORMAL and REVERSE positions.
When controlled by the signal box, an SL lock secures:
- the hand throw lever in the NORMAL position, and
- the selector lever in the MOTOR position.
Manually operating the points
Qualified Worker
- Check the position of the points at each points machine.
Operate points machines at crossovers in order from the trailing end to the facing end.
- Undo and remove the SL lock securing the selector and hand throw levers.
- Lift the catch holding the selector and hand throw levers.
- Operate the selector lever to the hand position.
- Operate the hand throw lever to move the points to the required position.
- Make sure that the switch rail is hard against the stock rail.
- Keep the hand throw lever in place with the catch. If it is not held by the catch when the switch rail is hard against the stock rail, tell the Signaller.
- Repeat steps 1 to 6 for the facing end.
- If necessary, clip and lock the facing end.
Returning to signal box control
Qualified Worker
- Make sure that the points and hand throw lever are in the normal position.
- Operate the selector lever to the MOTOR position.
- Lower the catch holding the selector and hand throw levers.
- Replace the SL lock.
- Ask the Signaller to test the points.
- Confirm with the Signaller that the points operate correctly.
- If the points do not operate correctly, get instructions from the Signaller.
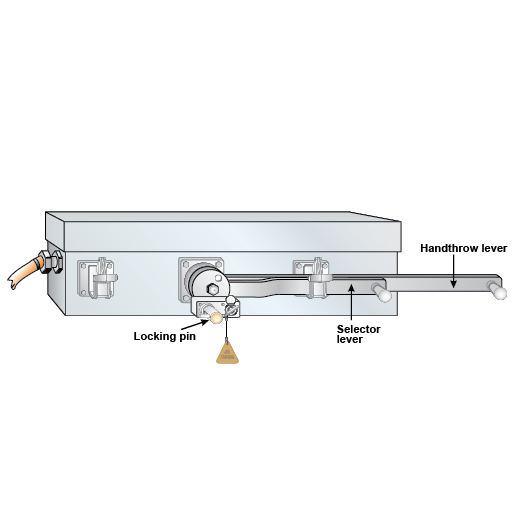
Hand throw points released by an EOL key
These points have:
- a short selector lever with HAND and MOTOR positions to allow the points to be switched between signal box control and trackside control, and
- a long hand throw lever with NORMAL and REVERSE positions.
When controlled by the signal box, a locking pin released by an EOL key secures:
- the handthrow lever in the NORMAL position, and
- the selector lever in the MOTOR position.
Manually operating the points
Qualified Worker
- Find the correct EOL cabinet for the points.
- Unlock the cabinet with an SL key.
- If there are instructions in the cabinet to help you to operate the points, read and follow them.
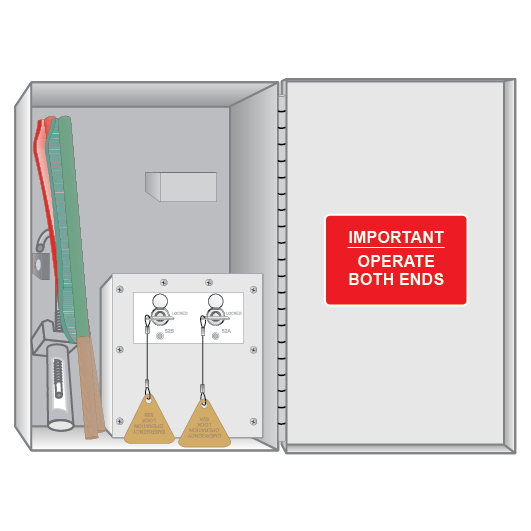
- check the key labels to make sure they are the correct keys.
- Turn the EOL keys from LOCKED to UNLOCKED. Take the keys from the cabinet. Removing a key sets the protecting signals at STOP.
When manually operating points, operate the trailing end first.
- Turn the EOL key in the EOL lock on the points machine. The lock captures the key.
- Pull out the locking pin to allow the levers to be moved.
- If the points machine has an SL lock, unlock it.
- Lift the catch holding the selector and hand throw levers.
- Operate the selector lever to the HAND position.
- Operate the hand throw lever to move the points to the required position.
- Make sure that the switch rail is hard against the stock rail.
- Keep the hand throw lever in place with the catch. If it is not held by the catch when the switch rail is hard against the stock rail, tell the Signaller.
- Repeat steps 6 to 13 for the facing end.
- If necessary, clip and lock the points at the facing end.
- Get instructions from the Signaller.
Returning to signal box control
Signaller
- When told by the Qualified Worker that the points can be returned to signal box control:
- identify the position of the points
- set the points to the required position using the points control.
Some hand throw points can be left in the reverse position when returning control to the signal box.
Qualified Worker
- Lift the catch holding the hand throw and selector levers.
- If required to return control of points in the normal position:
- make sure that the points are set to the normal position
- operate the hand throw lever to the NORMAL position
- operate the selector lever to the MOTOR position.
- If required to return control of points in the reverse position:
- make sure that the points are set to the reverse position
- operate the selector lever to the MOTOR position
- operate the hand throw lever to the NORMAL position.
- Push in the locking pin.
- Remove the EOL key.
- Lower the catch holding the selector and hand throw levers.
- Replace the SL lock, if provided.
- Return the EOL key to the correct cabinet.
- Turn all switches in the cabinet to the LOCKED position and lock the cabinet.
- Unless the points have been restored to signal box control for one route only:
- ask the Signaller to test the points, and
- confirm that the points operate correctly, and
- if the points do not operate correctly, get instructions from the Signaller.